How to Install GPT Workspace: Extension & Add-on Guide
Complete guide to installing GPT Workspace as a Chrome Extension or Google Workspace Add-on. Covers setup, AI model selection, prompt management, team deployment, and troubleshooting.
Installing the GPT Workspace Chrome extension takes about two minutes, but getting the most out of it requires understanding a few setup decisions upfront: which installation method fits your situation, which AI model to use for different tasks, and how to configure the tool so it actually improves your workflow rather than adding another thing to manage. This guide covers all of it.
Whether you’re a solo user setting up for personal productivity or an IT admin deploying to a hundred-person team, you’ll find the relevant steps here.
Chrome Extension vs Google Workspace Add-on: What’s the Difference?
GPT Workspace is available in two forms, and the right choice depends on your context.
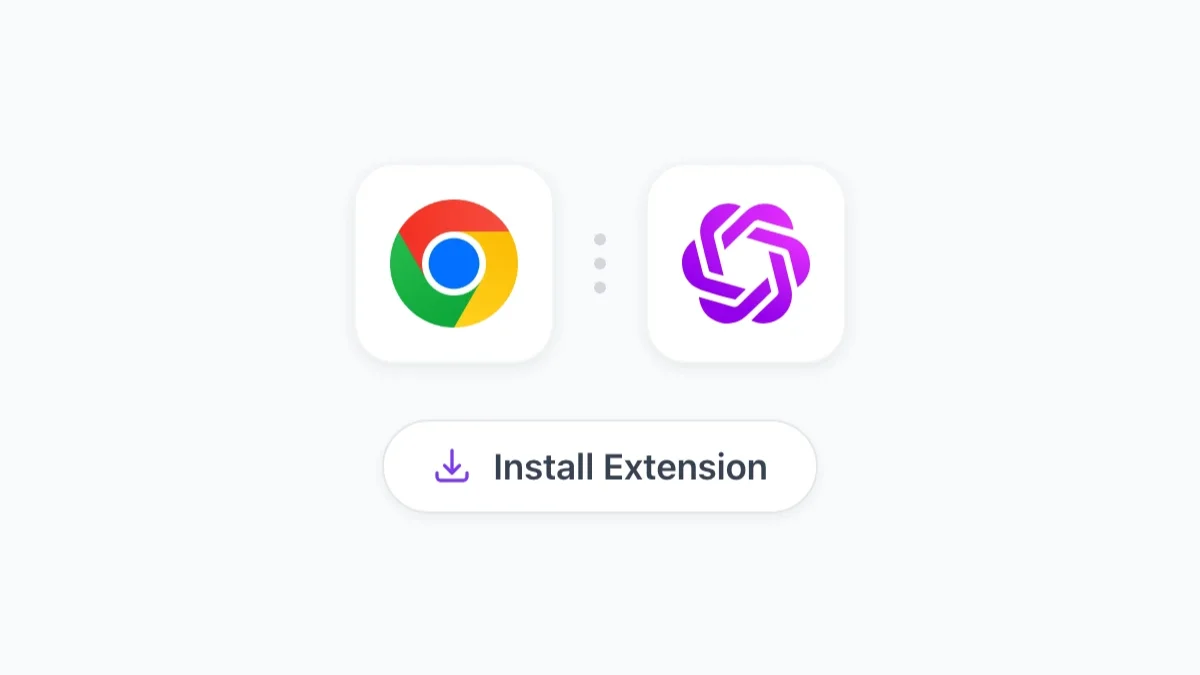
The Chrome Extension is the most common entry point. You install it once in Chrome, and it automatically activates whenever you open Google Docs, Sheets, Slides, or Gmail. The extension injects the AI sidebar into the interface without any per-app setup required. It works immediately across all four apps.
The limitation: it’s tied to Chrome on a specific machine. If you use multiple computers, you’ll need to install the extension on each one (or use Chrome profile sync). It also requires Chrome — it won’t work in Firefox, Safari, or other browsers.
The Google Workspace Add-on is the better choice for managed environments. An admin can deploy it organization-wide from the Google Admin Console, meaning every user in the organization gets access without needing to install anything individually. The Add-on is also accessible from the Extensions menu inside each Google app, making it discoverable without browser toolbar management.
The Add-on version works the same way functionally — same AI sidebar, same models, same prompts — but it’s scoped to the specific Google app you’re in, rather than running passively across all of them simultaneously.
Recommendation: Individual users and small teams → Chrome Extension. Organizations with a Google Workspace admin → Add-on deployed via Admin Console. If you’re unsure, start with the Chrome Extension. You can always switch.
How to Install the Chrome Extension (Step-by-Step)
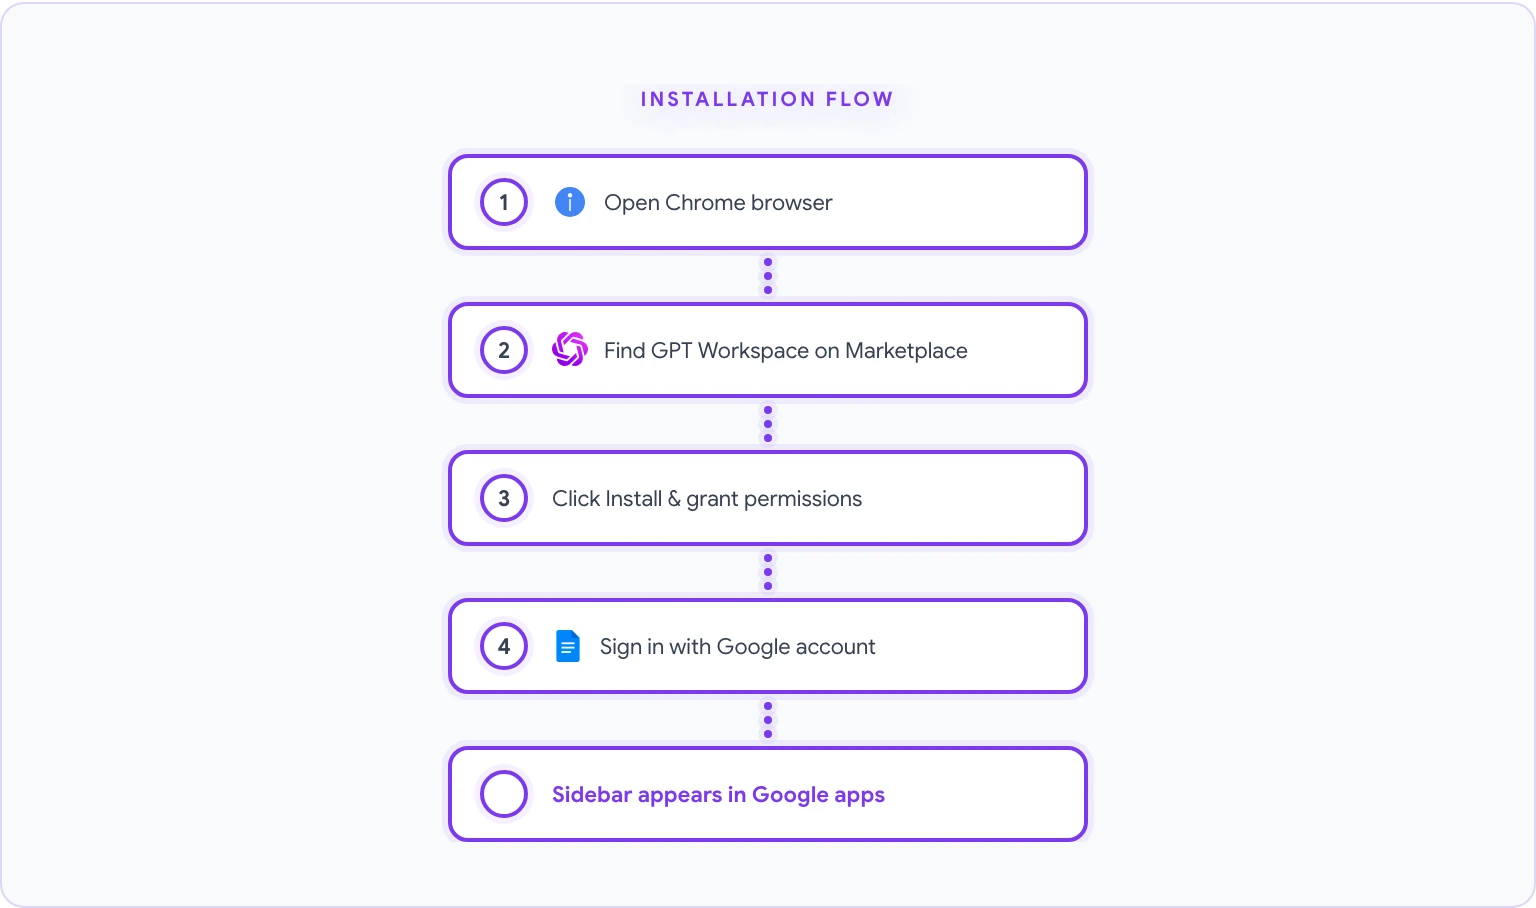
- Open Google Chrome on your desktop or laptop.
- Navigate to the GPT Workspace listing on the Google Workspace Marketplace. This is the official listing — be cautious of unofficial extensions with similar names.
- Click the blue Install button. A permissions dialog will appear.
- Review the permissions. GPT Workspace requests access to Google Docs, Sheets, Slides, Gmail, and Drive. These permissions are necessary for the AI sidebar to read your document content and write results back in. Click Allow.
- Once installed, you’ll see the GPT Workspace icon (a small icon in your Chrome toolbar, usually in the top-right corner). If you don’t see it, click the puzzle icon in the Chrome toolbar to find and pin it.
- Click the extension icon and sign in with your Google account. Choose the account associated with your Google Workspace if you have multiple.
- A brief onboarding walkthrough will appear. Complete it to confirm your setup is working.
To verify the installation worked:
- Open any Google Doc.
- The GPT Workspace sidebar should appear on the right side of the screen automatically.
- If it doesn’t appear, click the extension icon in the Chrome toolbar to toggle it.
That’s it. The extension is now active in all supported Google apps.
How to Install as a Google Workspace Add-on
For individual installation of the Add-on (without admin deployment):
- Open Google Docs, Sheets, or Slides.
- Click Extensions in the top menu bar.
- Select Add-ons > Get add-ons.
- In the Google Workspace Marketplace that opens, search for GPT Workspace or GPT for Docs, Sheets, Slides.
- Click the listing and then Install.
- Grant the requested permissions and sign in with your Google account.
- The Add-on will now appear under Extensions > GPT for Sheets, Docs, Slides, Forms in each supported Google app.
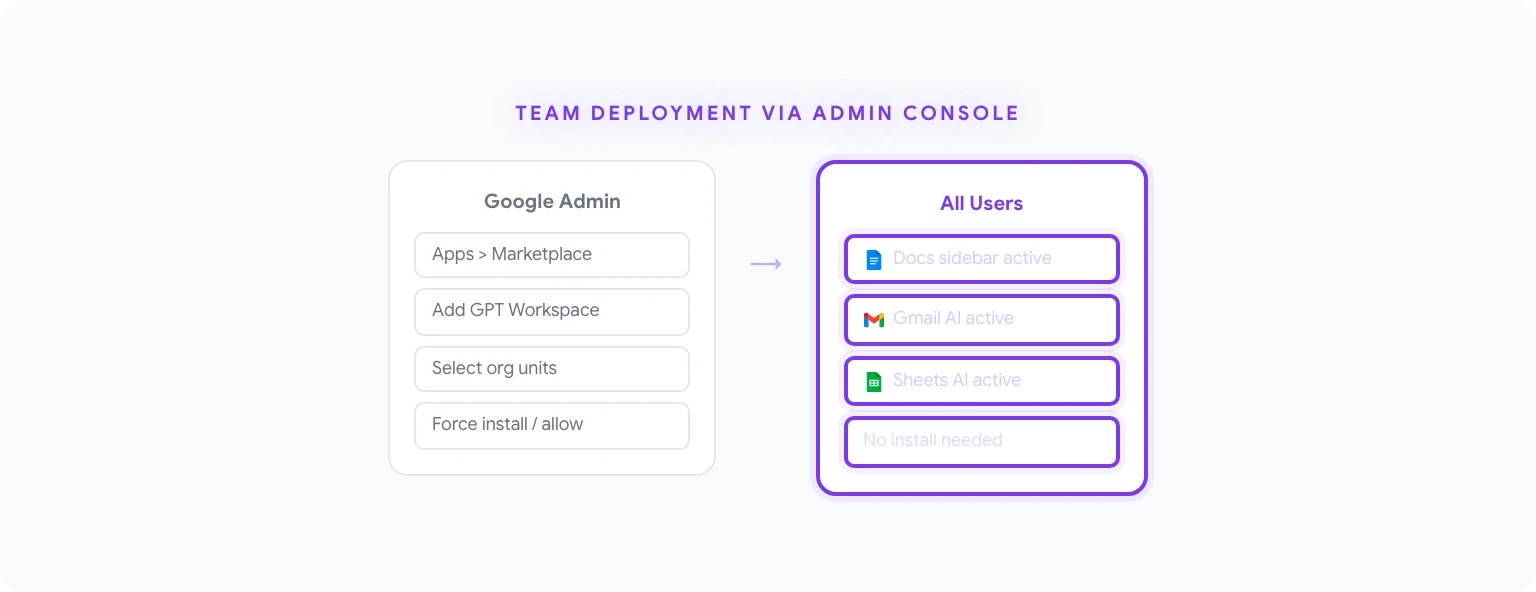
For admin-managed deployment across an organization:
- Sign in to the Google Admin Console at admin.google.com.
- Go to Apps > Google Workspace Marketplace apps.
- Click Add app to domain install list and search for GPT Workspace.
- Select the organizational units you want to deploy to (or select the root organization for everyone).
- Choose whether to force-install it (users see it automatically) or allow users to install it themselves.
- Click Finish. Deployment propagates to users within a few hours.
Admins can also configure which AI models are available to users and set organization-level defaults through the GPT Workspace admin settings — useful for ensuring teams use approved models only.
Setting Up Your AI Model
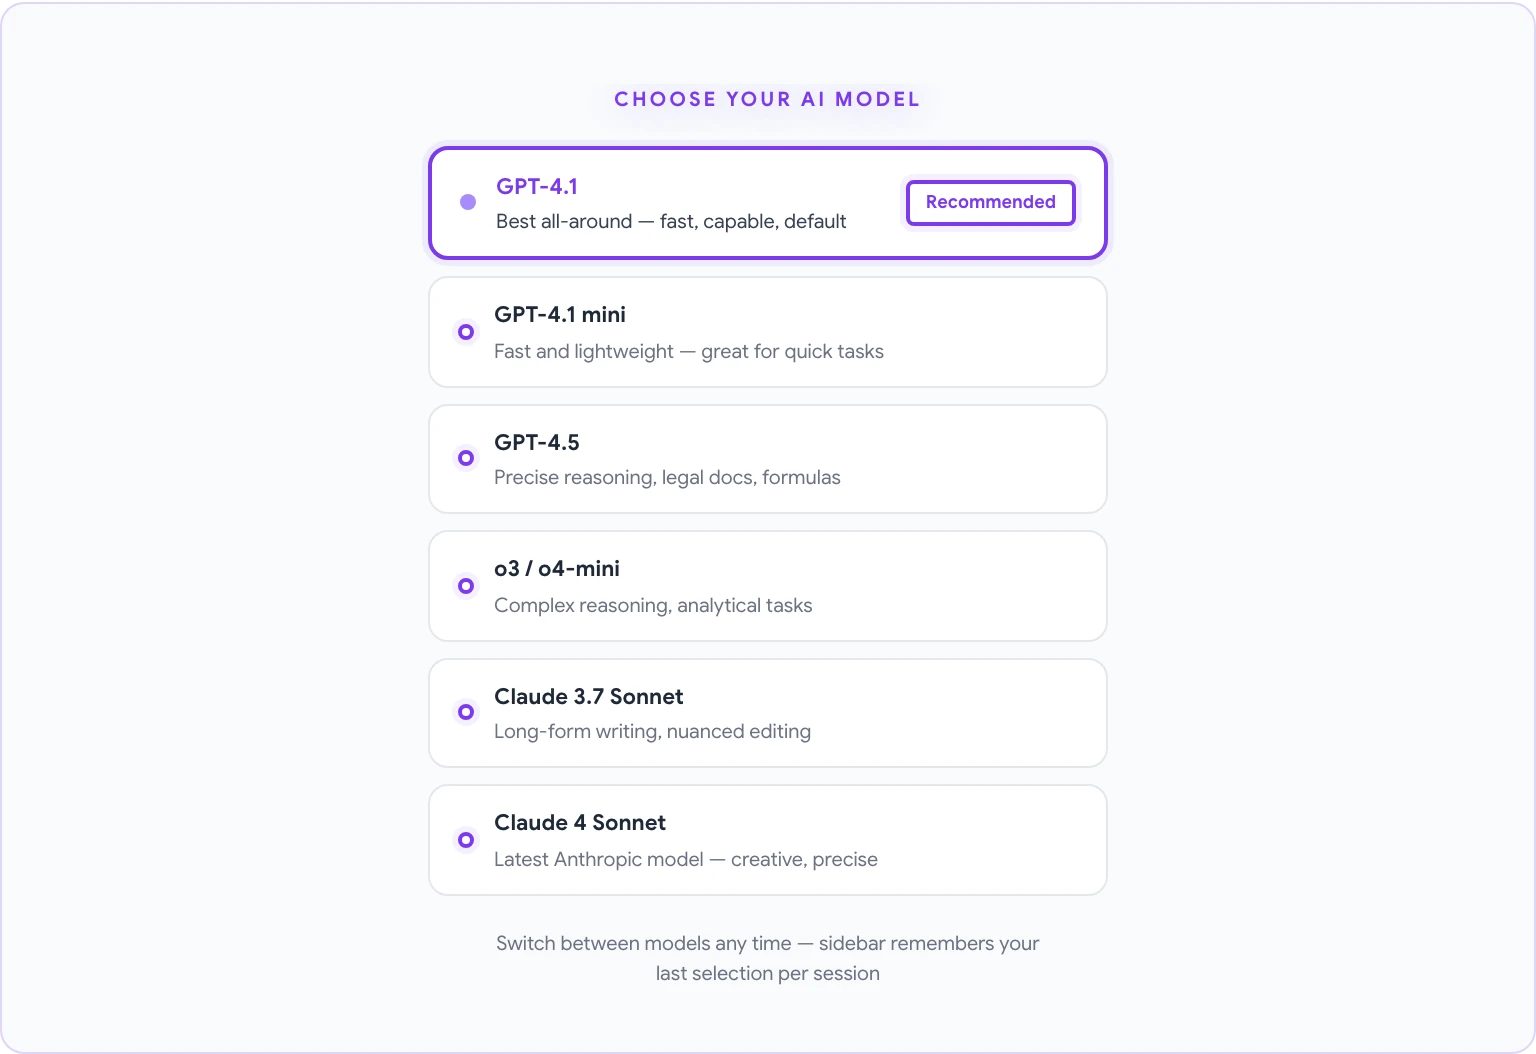
When you first open the GPT Workspace sidebar, you’ll be on the default model — typically GPT-4.1. This is a solid starting point, but you can change it based on your needs.
To select a model:
- Open the GPT Workspace sidebar in any Google app.
- Click the model name at the top of the sidebar (it displays the current model).
- A dropdown will show available models. Select the one you want.
Model selection guidance:
- GPT-4.1 — The default and best all-around choice. Fast, capable, and handles writing, analysis, summarization, and translation well. Use this for most tasks.
- GPT-4.1 mini — A lighter, faster version of GPT-4.1. Ideal for quick, repetitive tasks where speed matters more than depth.
- GPT-4.5 — Better for tasks requiring careful, precise reasoning (e.g., legal document analysis, complex formula generation). Costs more credits.
- o3 / o4-mini — OpenAI’s reasoning models, optimized for multi-step analytical tasks, math, and complex logical problems.
- Claude 3.7 Sonnet — Strong for long-form writing and nuanced editing. If you find GPT-4.1’s tone too formal or too casual for a specific task, Claude often gives better stylistic results.
- Claude 4 Sonnet — Anthropic’s latest model. Excellent for creative writing, detailed document work, and tasks requiring nuanced instruction-following.
- Gemini Pro — Useful if you want to compare with Google’s native AI or if you’re using GPT Workspace as a comparison layer across models.
If you’re on a free plan, you’ll have access to the default GPT-4.1 model. Paid plans unlock additional models and higher usage limits. For a breakdown of what’s included at each tier, see the GPT Workspace pricing page.
You don’t need to commit to a single model. The most experienced users switch models mid-session depending on the task — GPT-4.1 for speed and general tasks, Claude for editing-heavy work, o3 for precision analytical tasks. The sidebar remembers your last selection per session.
Your First AI Task in Google Docs
Once installed and configured, here’s a quick test to confirm everything is working correctly:
- Open a new Google Doc.
- The GPT Workspace sidebar should appear on the right. If not, click the extension icon in the toolbar.
- In the prompt field at the bottom of the sidebar, type: “Write a one-paragraph introduction for a guide about remote work best practices.”
- Press Enter or click the send button.
- After a few seconds, a response should appear in the sidebar.
- Click Insert at cursor (or Insert if that’s the label in your version) to place the text in your document.
If this works, your installation is complete and functioning correctly.
For a full walkthrough of everything you can do in Google Docs with GPT Workspace — from generating first drafts to translating documents — see how to use ChatGPT in Google Docs. For Sheets-specific workflows like formula generation and data analysis, see how to use AI in Google Sheets.
Managing Prompts and Templates
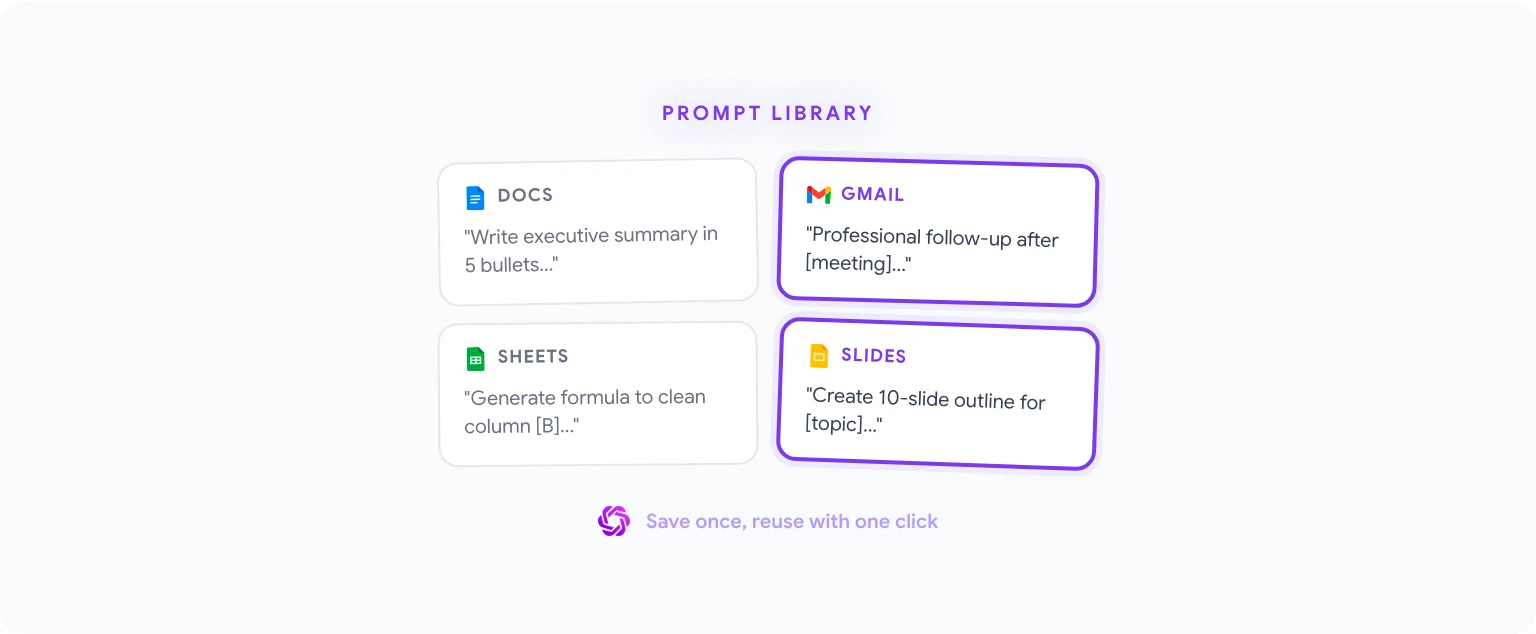
The prompt library is one of GPT Workspace’s most underused features. Instead of typing the same instruction every time, you can save it once and reuse it with a single click.
To save a custom prompt:
- Type a prompt in the sidebar.
- Before or after running it, click the bookmark icon next to the input field (or the “Save prompt” option, depending on your version).
- Give the prompt a name and confirm. It will appear in your saved prompts list.
To use a saved prompt:
- Open the sidebar.
- Click the prompt library icon (usually a folder or list icon near the input field).
- Select your saved prompt. It will populate the input field — edit it if needed, then send.
Sharing prompts with a team:
On paid plans, you can publish prompts to a shared team library. Everyone in the organization sees the same curated list of approved prompts. This is valuable for standardizing how your team uses AI — ensuring everyone writes summaries, emails, or reports in a consistent format.
Building a useful prompt library starts with a short list:
- Your most frequently used task (e.g., “Write a professional follow-up email based on these notes”)
- Your most time-consuming task to describe (e.g., a complex formula you generate regularly)
- Your most style-sensitive task (e.g., “Rewrite in our brand voice: direct, friendly, no jargon”)
For email-specific prompts and templates, writing emails with AI in Gmail covers a complete prompt library for Gmail users.
Troubleshooting Common Issues
The sidebar doesn’t appear in Google Docs.
Check that the extension is enabled in Chrome. Go to chrome://extensions, find GPT Workspace, and confirm the toggle is on. Also check that you’re signed in — the sidebar won’t load if you’re not authenticated.
“Access denied” or “Permission error” when trying to use the AI. This usually happens on managed Google Workspace accounts where the admin hasn’t allowlisted the extension. Ask your IT admin to allowlist GPT Workspace, or use the Add-on version instead (which often has fewer restrictions in managed environments).
The extension is installed but not activating in Google Docs.
Try refreshing the Google Docs page. If that doesn’t work, disable and re-enable the extension from chrome://extensions, then reload the page. In rare cases, a Chrome update can temporarily conflict with extension behavior — restarting Chrome usually resolves it.
Responses are slow or timing out. This is usually a network issue or a temporary overload on the AI provider’s servers. Switching to a different model (e.g., from GPT-4.5 to GPT-4.1) often resolves timeout issues since GPT-4.1 is faster. If you’re on a corporate VPN, try disconnecting temporarily to see if that’s the cause.
The AI is inserting text in the wrong location in the document. Make sure your cursor is positioned where you want the text before clicking Insert. The extension inserts at the current cursor position — if the cursor has moved since you sent the prompt, the insertion point may not be where you expect.
Conflict with another Chrome extension. Some ad blockers or privacy extensions block the API calls that GPT Workspace relies on. If you’re experiencing persistent issues, try disabling other extensions temporarily to identify the conflict. Grammarly and other writing assistants sometimes conflict — disabling them while using GPT Workspace and re-enabling after is a workable temporary solution.
Team Setup: Deploy GPT Workspace for Your Organization
For teams of 5 or more, a structured deployment is worth the extra setup time. Here’s the recommended approach:
1. Deploy via Admin Console (not individual installs) Use the Add-on deployment method described above. This ensures consistent access for everyone and avoids the support burden of helping individual users install and configure the extension themselves.
2. Configure default model and settings In the GPT Workspace admin panel (available on Business plans), set the default AI model for your organization. This prevents situations where different team members are using different models and getting inconsistent results.
3. Build a shared prompt library before launch Collect the 10–15 most common writing and analysis tasks your team performs. Write and test prompts for each, then publish them to the shared library before rolling out to users. First impressions matter — if people open GPT Workspace and immediately see useful, ready-to-use prompts, adoption is significantly higher than if they open it to a blank input field.
4. Run a 30-minute onboarding session The most common reason teams don’t get value from AI tools is that people don’t know where to start. A short live demonstration — showing three real use cases from your team’s actual workflow — is more effective than any documentation.
5. Monitor usage and iterate Most Business plans include basic usage analytics. Review them after 2–4 weeks to see which features are being used and which aren’t. If formula generation has zero usage in a team that works in Sheets all day, it probably means people don’t know it exists — not that they don’t want it.
For a comparison of how GPT Workspace stacks up against Microsoft 365 Copilot (relevant if your organization is evaluating both), see GPT Workspace vs Microsoft Copilot.
Ready to get started? Install GPT Workspace from the Marketplace, or visit the GPT Workspace pricing page to compare plans before installing.
Frequently Asked Questions
Is there a free plan? Yes. GPT Workspace has a free tier with a limited number of AI interactions per month. It’s enough to evaluate the tool and for light use. Paid plans start at a monthly subscription and remove usage limits.
What Google account type do I need? GPT Workspace works with personal Google accounts (gmail.com) and Google Workspace accounts (G Suite for business, education, nonprofits). The Add-on deployment via Admin Console requires a Google Workspace account with admin access.
Can I use GPT Workspace with Google Workspace for Education? Yes, though your institution’s admin must approve and deploy the Add-on. Many education Workspace accounts have stricter app approval policies — check with your IT department.
Does installing GPT Workspace give it access to all my Google Drive files? The extension requests Drive access to enable features like reading documents for context. It does not proactively scan or store your files. Access is used only when you actively prompt the AI in a document you have open.
Will it work after Google updates Google Docs? Yes. GPT Workspace is maintained and updated to stay compatible with Google’s apps. Occasional brief compatibility issues can occur immediately after a major Google update, but these are typically resolved within a day or two via an automatic extension update.
Can two people use GPT Workspace simultaneously in a shared document? Each user’s GPT Workspace sidebar is personal to their session. Two people editing the same document can both use AI at the same time — their interactions are independent and don’t interfere with each other.